What’s a CucoStudio Style?
Instead of creating a one-off After Effects template that gets old quickly, a CucoStudio Style lets you build a reusable and flexible system.
Designers retain full control over visual identity. Writers and editors get a frictionless interface to create videos without needing to touch After Effects.
Key Concepts
A Style is made of shots — just After Effects compositions.
Each shot has three parts:
- Text — for on-screen text, like captions and titles.
- Frame — where CucoStudio places visuals like images, videos, or GIFs.
- Controller — handles timing, so your animation fits however long the shot lasts.
The text and frame decide where things sit on screen. The controller has no look of its own; it works behind the scenes.
When a story is turned into a video, CucoStudio picks the most fitting shots and fills them with content.
For more detail on these elements, see the Concepts page.
The CucoStudio Toolbox
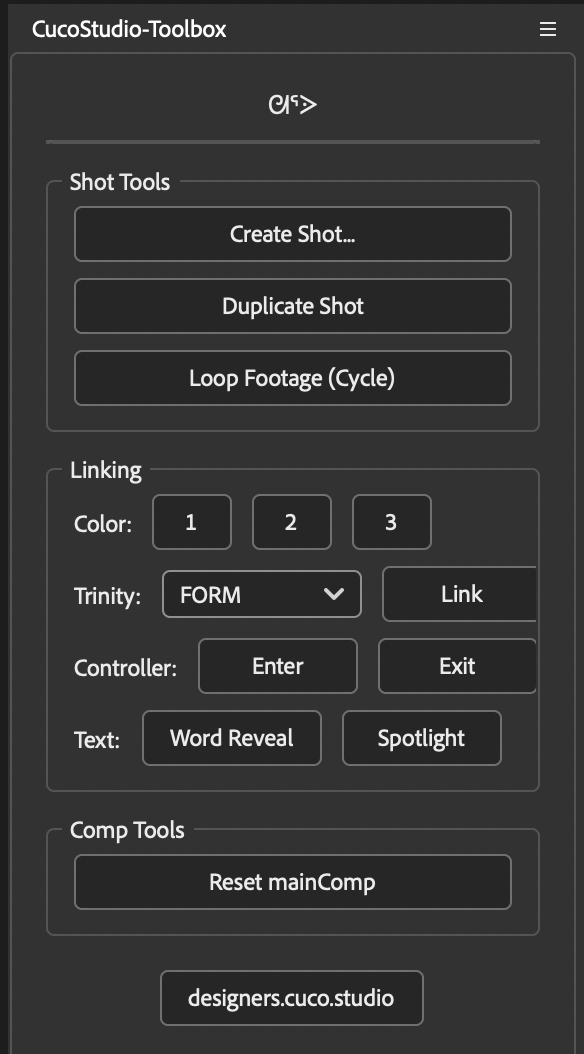
The Toolbox is a panel for After Effects that does the setup and wiring for you, so you can focus on design instead of writing expressions. It’s installed automatically with CucoStudio. In After Effects, open it from the Window menu: look for CucoStudio-Toolbox.jsx.
Create a shot
Click Create Shot…, pick the size, frame rate and duration, and you get the bare bones of a Style: a shot that already has its text, frame and controller.
In the Project panel you’ll find two things:
- mainComp — where the final video is put together.
- ORIGINAL_SHOTS — the folder that holds your shots.
Inside a shot
Open a shot and you’ll see its three parts right away: the text, the frame and the controller.
The text is a composition for captions and titles. Style it however you like: font, color, box, animation. CucoStudio swaps in the words from each part of the story.
The frame is for media. The images, GIFs and videos a writer attaches to a part of the story land here. Design the frame like any other layer: move it, scale it, mask it, animate it.
The controller makes your animation fit any timing. Every shot gets a different length depending on what’s being said, so you don’t animate to fixed frames. The controller has two sliders, Enter and Exit. Each one goes from 0 to 100 as the shot animates in and out.
Link your animation
Animate as you normally would with keyframes. Then select the animated properties and click Enter (or Exit) in the Toolbox. Your animation now follows the controller: it plays in when the shot starts and out when it ends, however long the shot is.
The rest of the Toolbox
| Button | What it does |
|---|---|
| Duplicate Shot | Copies the shot you’re in, with its own text and frame. The quickest way to start a new one. |
| Loop Footage | Makes the selected footage repeat for as long as the shot lasts. |
| Color 1, 2, 3 | Links the selected colors to the Style’s color palette, so a whole video can be recolored at once. |
| Trinity + Link | Links the selected properties to Form, Flow or Pressure, the dials that set a video’s character. |
| Word Reveal | Builds the text up word by word. |
| Spotlight | Shows one word at a time. |
| Reset mainComp | If you change shot lengths in a finished video, this lines everything back up. |
We’ll keep adding to the Toolbox as Styles grow more sophisticated.
Get Started
There are two ways to begin:
Option A: Start from scratch
- Open After Effects and the Toolbox, then click Create Shot…
- Design your text and frame, animate them, and link the animation to the controller.
- Save the project in its own folder and add it to CucoStudio (see below).
- Once it works, expand by adding more shots. Duplicate Shot is a quick start.
Option B: Modify an existing Style
- In CucoStudio, browse the published Styles and download one you like. You choose where to save its folder.
- Open it in After Effects to see how it’s structured.
- Modify the design however you like — just don’t rename or delete the text, frame and controller layers or the comp names.
Loading Your Style
A Style is a folder: your After Effects project plus everything it uses. Keep your footage, images and fonts inside that folder. File > Dependencies > Collect Files is a quick way to gather them.
When you’re happy with your first shot:
- In CucoStudio, open the Styles panel and click Add Style.
- Give your Style a name and click Continue.
- Pick your Style’s folder.
CucoStudio reads your shots, fonts and colors straight from the project. There’s nothing to zip or upload.
Testing Your Style
Once you have a couple of shots, try your Style on a real story. Write a few lines, pick your Style and make a video. Seeing how your shots handle real content is the fastest way to find what to improve.
Every video stays editable. Click Get Project on any version and you get its After Effects project, built from your shots.
Adding Voice
CucoStudio has a built-in text-to-speech model that creates narrations from plain text. You can customize the voice by providing a sample with your desired tone.
Add a recording named voice_sample.wav to your Style’s folder: around 20 seconds of clear speech. Every video made with your Style will be narrated in that voice.
Updating Your Style
Your Style can grow and evolve over time — add new shots, refine timing, or change the voice.
Because CucoStudio points to your folder, there’s nothing to re-upload. Open the project, make your changes and save. The next video you make uses the latest version.
This lets you work with a brand not just as a one-off project designer, but as the maintainer of their visual identity.
Adding a Poster
Add a GIF to your Style’s folder and it will be used as an animated poster. A WebM, PNG or JPG works too.
We’re constantly expanding what Styles can do — so your design system can evolve with it.
Your design is not a file. It’s a system.
If you get stuck or have any questions, join us on our discord. We are a very small team, but we’ll make sure to help you out. And if you make something cool and want to publish it, let us know.